研究的源代码版本为1.3.0-SNAPSHOT,使用的环境为linux(fedora 4.7.2-201.fc24.x86_64)
上篇文章说到,从bootstrap启动器,使用Process启动起了org.apache.nifi.NiFi类,这篇文章沿着org.apache.nifi.NiFi的main方法继续向下研读.
该类所做事情大致分为:
- 创建第一个名为bootstrap的classloader,隶属于根classloader.
- 反射org.apache.nifi.properties.NiFiPropertiesLoader类,用于读取conf/nifi.properties配置文件中的配置文件到NiFiProperties结构中.
- 创建与bootstrap启动器的socket通信
- 解压所有的nar插件,并且为其创建单独的classloader
- 启动NiFi的web工程(即NiFi封装的jetty server)
一.为插件机制准备第一个classloader
该classloader为后续所有插件的classloader的父级,这样组织了一个完整的树下来,形式如下:

创建这种classloader的好处是为了隔离不同的nar之间jar错综复杂的依赖关系,这样加载起来的项目运行时,切换到自己的classloader下可以防止出现不可预知的问题.
程序首先创建了bootstrapClassloader,代码如下:
private static ClassLoader createBootstrapClassLoader() throws IOException {
        //Get list of files in bootstrap folder
        final List<URL> urls = new ArrayList<>();
        Files.list(Paths.get("lib/bootstrap")).forEach(p -> {
            try {
                urls.add(p.toUri().toURL());
            } catch (final MalformedURLException mef) {
                LOGGER.warn("Unable to load " + p.getFileName() + " due to " + mef, mef);
            }
        });
        //Create the bootstrap classloader
        return new URLClassLoader(urls.toArray(new URL[0]), Thread.currentThread().getContextClassLoader());
    }
- 程序首先从lib/bootstrap中取出所有的jar包
activation-1.1.jar json-smart-2.1.1.jar antlr-runtime-3.5.2.jar logback-classic-1.2.3.jar asm-1.0.2.jar logback-core-1.2.3.jar asm-3.3.1.jar mail-1.4.7.jar bcpkix-jdk15on-1.55.jar nifi-api-1.3.0-SNAPSHOT.jar bcprov-jdk15on-1.55.jar nifi-bootstrap-1.3.0-SNAPSHOT.jar commons-codec-1.10.jar nifi-expression-language-1.3.0-SNAPSHOT.jar commons-lang3-3.5.jar nifi-properties-loader-1.3.0-SNAPSHOT.jar jackson-annotations-2.6.0.jar nifi-security-utils-1.3.0-SNAPSHOT.jar jackson-core-2.6.1.jar nifi-utils-1.3.0-SNAPSHOT.jar jackson-databind-2.6.1.jar okhttp-3.6.0.jar jna-4.4.0.jar okio-1.11.0.jar jna-platform-4.4.0.jar slf4j-api-1.7.25.jar json-path-2.0.0.jar - 创建父classloader为AppClassloader的,并且将上述的所有jar包加入到该classloader的classpath中,至此,bootstrapClassloader创建完成.
二.加载conf/nifi.properties配置文件中的配置
程序使用反射的机制,加载起org.apache.nifi.properties.NiFiPropertiesLoader类,使用该类的get方法获取配置信息.
 Thread.currentThread().setContextClassLoader(boostrapLoader);
final Class<?> propsLoaderClass = Class.forName("org.apache.nifi.properties.NiFiPropertiesLoader", true, boostrapLoader);
final Method withKeyMethod = propsLoaderClass.getMethod("withKey", String.class);
final Object loaderInstance = withKeyMethod.invoke(null, key);
final Method getMethod = propsLoaderClass.getMethod("get");
final NiFiProperties properties = (NiFiProperties) getMethod.invoke(loaderInstance);
LOGGER.info("Loaded {} properties", properties.size());
return properties;
通过代码我们可以看到,当前的classloader被切换到了bootstraploader上,因为NiFiPropertiesLoader类属于nifi-properties-loader-1.3.0-SNAPSHOT.jar,然后调用get方法获取回所有的配置信息. 具体的读取配置的代码不再详述,有兴趣的可以自行debug…
上篇文章中有描述org.apache.nifi.NiFi类被启动的脚本为:
java -classpath /backup/nifi-1.3.0-SNAPSHOT/./lib/nifi-properties-1.3.0-SNAPSHOT.jar org.apache.nifi.NiFi
这里我们可以看到,其实在AppClassloader中,已经存在了所有的lib/bootstrap中的依赖,且和bootstraploader中的urls一致,不知道为什么单独干一层bootstrap.
三.程序的完整及健壮的保证
-
创建shutdownhook
在org.apache.nifi.NiFi这个虚拟机关闭之前优雅的去关闭掉NiFi的web容器,以及关闭掉与bootstrap启动器通信的socket线程.具体如何创建的,后续慢慢叙述,这里只是做了优雅关闭的功能. -
创建与bootstrap启动器的socket通讯
 serverSocket = new ServerSocket();
 serverSocket.bind(new InetSocketAddress("localhost", 0));
 serverSocket.setSoTimeout(2000);

 final int localPort = serverSocket.getLocalPort();
 logger.info("Started Bootstrap Listener, Listening for incoming requests on port {}", localPort);

 listener = new Listener(serverSocket);
 final Thread listenThread = new Thread(listener);
 listenThread.setDaemon(true);
 listenThread.setName("Listen to Bootstrap");
 listenThread.start();

 logger.debug("Notifying Bootstrap that local port is {}", localPort);
 sendCommand("PORT", new String[] { String.valueOf(localPort), secretKey});
做的事情不是很复杂,首先在本地创建一个socketserver,然后建立与bootstrapserver的链接,之后将自己的端口发送到bootstrap.
case "PORT": {
 if (args.length != 2) {
     throw new InvalidCommandException();
 }

 final int port;
 try {
     port = Integer.parseInt(args[0]);
 } catch (final NumberFormatException nfe) {
     throw new InvalidCommandException("Invalid Port number; should be integer between 1 and 65535");
 }

 if (port < 1 || port > 65535) {
     throw new InvalidCommandException("Invalid Port number; should be integer between 1 and 65535");
 }

 final String secretKey = args[1];

 runner.setNiFiCommandControlPort(port, secretKey);
 writer.write("OK");
 writer.newLine();
 writer.flush();
}
break;
服务器收到消息之后,存储这个port,然后回复OK,基本的通讯就告一段落了.
四.解压所有插件,并且创建对应的classloader
- 解压所有nar包
private static File unpackNar(final File nar, final File baseWorkingDnarDependencyCoordinateirectory) throws IOException {
 final File narWorkingDirectory = new File(baseWorkingDirectory, nar.getName() + "-unpacked");

 // if the working directory doesn't exist, unpack the nar
 if (!narWorkingDirectory.exists()) {
     unpack(nar, narWorkingDirectory, calculateMd5sum(nar));
 } else {
     // the working directory does exist. Run MD5 sum against the nar
     // file and check if the nar has changed since it was deployed.
     final byte[] narMd5 = calculateMd5sum(nar);
     final File workingHashFile = new File(narWorkingDirectory, HASH_FILENAME);
     if (!workingHashFile.exists()) {
         FileUtils.deleteFile(narWorkingDirectory, true);
         unpack(nar, narWorkingDirectory, narMd5);
     } else {
         final byte[] hashFileContents = Files.readAllBytes(workingHashFile.toPath());
         if (!Arrays.equals(hashFileContents, narMd5)) {
             logger.info("Contents of nar {} have changed. Reloading.", new Object[] { nar.getAbsolutePath() });
             FileUtils.deleteFile(narWorkingDirectory, true);
             unpack(nar, narWorkingDirectory, narMd5);
         }
     }
 }

 return narWorkingDirectory;
}
这里其实没做太多的工作,主要是验证一下md5文件是否一致,不一致的时候就说明有改动需要重新加载.
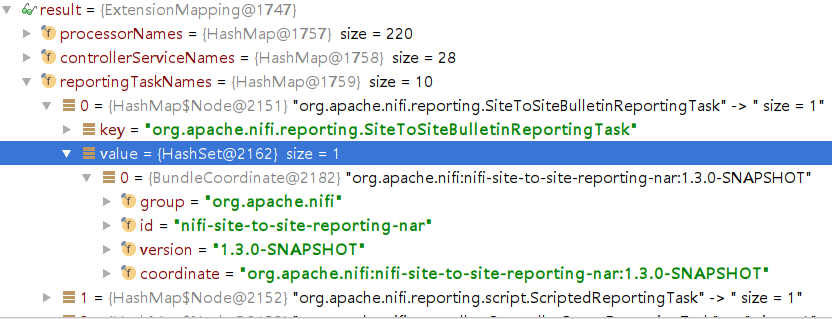
- 获取nar中的基本信息,并且封装成ExtensionMapping结构
 final Attributes attributes = manifest.getMainAttributes();
 final String groupId = attributes.getValue(NarManifestEntry.NAR_GROUP.getManifestName());
 final String narId = attributes.getValue(NarManifestEntry.NAR_ID.getManifestName());
 final String version = attributes.getValue(NarManifestEntry.NAR_VERSION.getManifestName());
这里还做了nar类型的分类,具体如图:
- 创建classloader
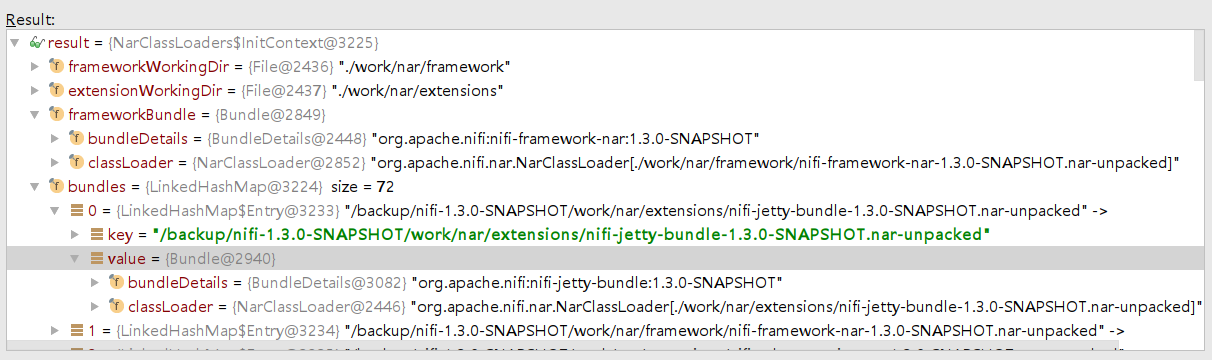
 // see if this class loader is eligible for loading
 ClassLoader narClassLoader = null;
 if (narDependencyCoordinate == null) {
     narClassLoader = createNarClassLoader(narDetail.getWorkingDirectory(), jettyClassLoader);
 } else {
     final String dependencyCoordinateStr = narDependencyCoordinate.getCoordinate();

     // if the declared dependency has already been loaded
     if (narCoordinateClassLoaderLookup.containsKey(dependencyCoordinateStr)) {
         final ClassLoader narDependencyClassLoader = narCoordinateClassLoaderLookup.get(dependencyCoordinateStr);
         narClassLoader = createNarClassLoader(narDetail.getWorkingDirectory(), narDependencyClassLoader);
     } else {
         // get all bundles that match the declared dependency id
         final Set<BundleCoordinate> coordinates = narIdBundleLookup.get(narDependencyCoordinate.getId());

         // ensure there are known bundles that match the declared dependency id
         if (coordinates != null && !coordinates.contains(narDependencyCoordinate)) {
             // ensure the declared dependency only has one possible bundle
             if (coordinates.size() == 1) {
                 // get the bundle with the matching id
                 final BundleCoordinate coordinate = coordinates.stream().findFirst().get();

                 // if that bundle is loaded, use it
                 if (narCoordinateClassLoaderLookup.containsKey(coordinate.getCoordinate())) {
                     logger.warn(String.format("While loading '%s' unable to locate exact NAR dependency '%s'. Only found one possible match '%s'. Continuing...",
                             narDetail.getCoordinate().getCoordinate(), dependencyCoordinateStr, coordinate.getCoordinate()));

                     final ClassLoader narDependencyClassLoader = narCoordinateClassLoaderLookup.get(coordinate.getCoordinate());
                     narClassLoader = createNarClassLoader(narDetail.getWorkingDirectory(), narDependencyClassLoader);
                 }
             }
         }
     }
 }

 // if we were able to create the nar class loader, store it and remove the details
 final ClassLoader bundleClassLoader = narClassLoader;
 if (bundleClassLoader != null) {
     narDirectoryBundleLookup.put(narDetail.getWorkingDirectory().getCanonicalPath(), new Bundle(narDetail, bundleClassLoader));
     narCoordinateClassLoaderLookup.put(narDetail.getCoordinate().getCoordinate(), narClassLoader);
     narDetailsIter.remove();
 }
这里的创建其实分为两种情况,对于子项目和非子项目,非子项目的直接创建,子项目的稍微复杂一些,要验证这个所属项目是否已经创建了,父项目还没有创建的时候,子项目等待.最后保存成InitContext结构:
五.启动NiFiServer
// load the server from the framework classloader
Thread.currentThread().setContextClassLoader(frameworkClassLoader);
Class<?> jettyServer = Class.forName("org.apache.nifi.web.server.JettyServer", true, frameworkClassLoader);
Constructor<?> jettyConstructor = jettyServer.getConstructor(NiFiProperties.class, Set.class);

final long startTime = System.nanoTime();
nifiServer = (NiFiServer) jettyConstructor.newInstance(properties, narBundles);
nifiServer.setExtensionMapping(extensionMapping);
nifiServer.setBundles(systemBundle, narBundles);
先切换到frameworkClassLoader,这里在上面的图片中可以看到,就是nifi-framework-nar工程的classloader,然后实例化jettyserver,封装到nifiserver类中,
nifiServer.start();

if (bootstrapListener != null) {
    bootstrapListener.sendStartedStatus(true);
}

final long endTime = System.nanoTime();
LOGGER.info("Controller initialization took " + (endTime - startTime) + " nanoseconds.");
这里调用nifiServer.start()开始真正的启动了web工程,具体细节的启动流程在之后文章里详细讲解.启动之后,向bootstrap启动器发送”STARTED”命令.